Developer's Guide to the MPESA B2C API
Based on all the questions I’ve been getting from fellow developers about how to work with the MPESA API, I thought it may be a good idea to write something on how to get started with it.
This post is not endorsed/sponsored/supported/advised by Safaricom
The notes here are from my experience working with Safaricom on various integrations - and are intended as a guide for fellow developers looking to work with the MPESA API
First, read this: https://www.safaricom.co.ke/business/corporate/m-pesa-payments-services/m-pesa-api
Done? Good! :)
The MPESA API has 3 main components:
- B2C - Business to Consumer - involves sending money to a customer (e.g. A bank sending money to customers’ MPESA accounts)
- C2B - Consumer to Business - involves receiving money from customers (e.g. A business accepting payments via an MPESA Paybill)
- B2B - Business to Business - involves transactions between businesses (e.g. a company paying another company via their MPESA Paybill)
In this post, I’ll describe what’s required to set up a B2C account, then dive a little deeper into the technical part of how the B2C API works.
In order to start using B2C, these are the basic requirements (please note I say basic, Safaricom may need more things):
- A business account with Safaricom - contact MPESA Business Support to enquire about this
- Once you’re set up on the business side, you’ll be given a technical contact to assist with the integration. The contact should guide you through the following:
- Network setup - access to the MPESA API system requires a VPN or a P2P connection from your servers to Safaricom. My thoughts on this is that it enhances security to some extent, since traffic can only be initiated from within the network.
- API Implementation - you should be given credentials to access the API, as well as a certificate used to encrypt the passwords
- Testing - you should be given access to the MPESA testing environment - which includes credentials for your test account
- SSL setup - After testing on a non-SSL environment, the contact should share SSL certificates that you need to set up on your server. Once you set this up, you’ll now access the test environment via an SSL-enabled endpoint (
https://) - Migration to production - after you’re done testing, they should help you get set up on the production environment
With that out of the way, we can go into detail about integrating to the API itself. Before proceeding, please make sure you’ve gone thru the documentation provided in this download from the MPESA API Website - specifically, the document labelled: “Developing B2C interface-v1.5.docx” - or whatever the most recent version is.
Pre-requisites
Before trying to access the API, make sure you have the following details:
- SP Credentials - Not sure what “SP” stands for, but you’ll need the following SP Credentials:
SPIDSPPasswordServiceID
- API Credentials:
Initiator UsernameInitiator Password
- API credentials encryption certificate - this one is used to encrypt the initiator password when calling the API
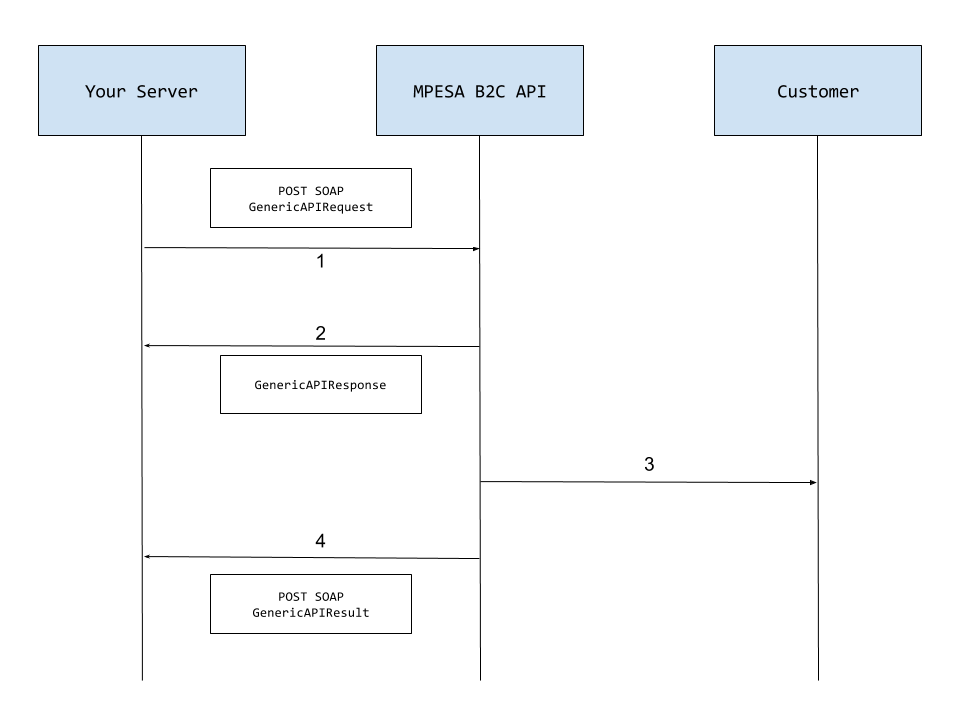
The diagram below shows a simplified version of how the API works from a developer’s perspective. I’ve explained the labelled parts below.
Note
- The MPESA API communicates using SOAP - I know, I know - chills all around - but - SOAP is only XML that needs to be formatted in a specific way. Once you understand a few things, then it becomes easier to work with:
- A SOAP server usually has a WSDL file - this is an XML file that describes how the web service works, for example, it could define:
- what methods are available on the web service
- what the request to the web service should look like (i.e. what fields it should have)
- Most programming languages have SOAP libraries that ease communication with SOAP web services - please refer to your preferred language’s docs
- In the case of the MPESA API, the WSDL files are provided in the zip file you downloaded; aptly named:
WSDL_V1.0.rar- decompress this file, and you should get a folder with different WSDL files - if you open these in your favorite text editor (you know Vim, Sublime Text, etc) - you’ll see that they are XML files - For B2C, 2 WSDL files are important to us:
CBPInterface_Request.wsdl- tells us what the request to the B2C API (calledGenericAPIRequest) should look like (i.e. step 1 in the diagram above). It also tells us what the response should look like (step 2)CBPInterface_Result.wsdl- tells us how we should implement the SOAP Server that MPESA will call with the final status of a transaction (step 4)
- The
.*xsdfiles are also important - they give a definition of the requests we’ll be sending to MPESA - we’ll refer to them later
- A SOAP server usually has a WSDL file - this is an XML file that describes how the web service works, for example, it could define:
Now, to the steps in the diagram above:
GenericAPIRequest- tells MPESA to send money from your business account, to a customer’s account (Section 4.1.1 of the API docs)GenericAPIResponse- tells us whether MPESA accepted the request or not. If the result here is not a successful one, this ends the interaction with the MPESA system.- If successful, MPESA transfers money from your business account to the customer (i.e. customer receives an SMS saying: “You have received Ksh 1000 from COMPANY NAME…blah blah”)
- MPESA API sends the final result of the transaction back to your server - you need to implement a SOAP Server to be able to receive the result (Section 4.2.1 of the API docs)
Implementation of the above process varies across different programming languages, but this should be enough to get you started.
I hope it answers at least some of your questions.
If you have any suggestions, improvements, clarifications - or if you want me to go into more detail about a specific section, let me know in the comments, or reach out.
Even better, make a Pull Request on Github with suggested changes: https://github.com/muya/muya.github.io - I’ll be happy to review & merge :)
Happy Coding!