Using Wiremock to Mock API Responses: Part 1
Wiremock is a tool that allows you to mock API endpoints for your services, making it easier to test what you’re working on.
It can come in handy in a case where the application you’re working on interacts with other micro-services that expose API endpoints.
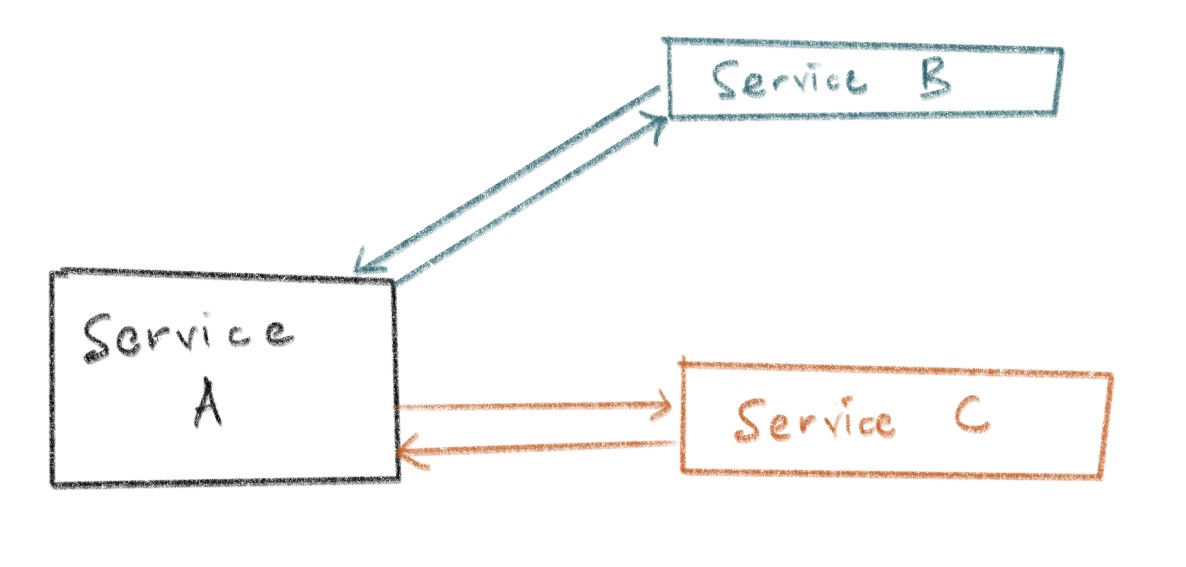
For example, using the diagram below, say you’re building Service A, which in turn depends on an API provided by Service B & Service C.
During the development phase, it’s important to be able to test what you’re building against real API endpoints.
If you have documentation for the APIs provided by Services B & C, you can set them up in Wiremock to be able to make calls and receive responses that these services return.
Wiremock can be set up in 2 ways:
- As a dependency in your JVM projects (e.g. via Maven)
- As a standalone process, which doesn’t require you to be running a JVM-based project
In this series of posts, I’ll be taking you through how to set up Wiremock as a standalone process for use in any of your projects.
- Part 1 (this one): Introduction to Wiremock (with static response)
- Part 2: Using Response Templating with Request Parameters
We’ll be using Docker to put all the dependencies together.
Let’s Do It!
What we’re building (and mocking)
For our example, we’ll be mocking a simple API that returns information on which songs a user likes.
The API request & response are as follows:
Request
GET /api/songsResponse
[
    {
        "id": "8efe58ee-a5cf-4926-bcd2-92c7e2ec82ba",
        "songInfo": "Jam Now, Simmer Down - Blinky Bill",
        "likedOn": "2021-06-19",
        "listenCount": 34
    },
    {
        "id": "724d520f-15b0-4c2f-9999-a28b2531195c",
        "songInfo": "Dunia Ina Mambo - Just a Band",
        "likedOn": "2020-12-04",
        "listenCount": 182
    }
]
Given that we’re fetching data, we’ll use a GET request. The response is a JSON array of objects which represents metadata about the songs the user likes.
Some things to note about the metadata:
id- a UUID to identify the songsongInfo- a string representing the name of the song and the artist, separated by a hyphen (-)likedOn- a date value, representing when the user marked the song as “liked”listenCount- an integer value representing how many times the song has been listened to
To keep it simple, we’ll exclude authentication.
If we’re working on an app that consumes this API, we’d like to have it such that we don’t have to interact with the actual system on which it’s hosted. This could be an advantage in cases where the API is still in development, or in cases requests to the API are billed 🤑🤑.
The goal is to mock the API defined above, so that we can access it directly, e.g. from your localhost. For example, if the actual API is available at:
https://ngoma.ke/api/songsWe’ll be able to access it at:
http://localhost:{some port}/api/songsSetting Up Wiremock
By running Wiremock in standalone mode, we can set up the mock for this API.
Luckily, there exists a Docker image (wiremock-docker) that makes it easy to utilize the standalone JAR file, and also allows us to set up and run the Wiremock JAR alongside our other apps.
For example, if you’re using a docker-compose file, you can have:
version: '3.9'
services:
  # set up for the app we're building
  music_app:
    ...
    ...

  # Wiremock docker image
  wiremock:
    image: rodolpheche/wiremock
    ... # other configs
This way, when you’re running docker-compose up for your project, the mocked endpoints can be brought up as well, allowing you to start making requests immediately.
In the most basic form, the Wiremock docker container can be set up by running:
# Pull the latest image
docker pull rodolpheche/wiremock

# Start the Wiremock container
docker run -it --rm -p 8080:8080 rodolpheche/wiremock
Read the Getting Started Guide for more details.
Setting Up wiremock-docker using docker-compose
In our case, since we’re using docker-compose file, follow the steps below to set it up.
Create a directory where you’ll set up the project (or you may utilize your current project’s directory). cd into this directory.
Create a docker-compose.yml file in the directory, copy the content below into the file, and save it.
version: '3.9'
services:
wiremock:
image: rodolpheche/wiremock
volumes:
- $PWD/wiremock:/home/wiremock
ports:
- 8080:8080
command:
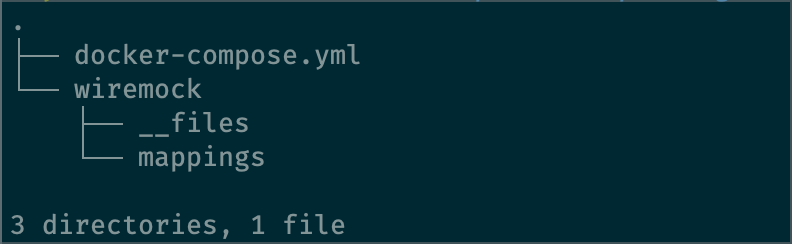
- --verboseCreate a directory named wiremock, and 2 sub-directories within it, named mappings and __files. This is where we’ll place all the mocks that will be used by Wiremock.
mkdir -p wiremock/mappings wiremock/__filesmappingswill contain all the different “stubs”, which generally represent different endpoints we want to mock. Read more about stubbing in the Wiremock Stubbing Docs__fileswill contain any custom files that we want to return as part of API responses, or templates that we want to use as part of the API response (more on this later)
Once you’re done, your directory structure should look something like this:
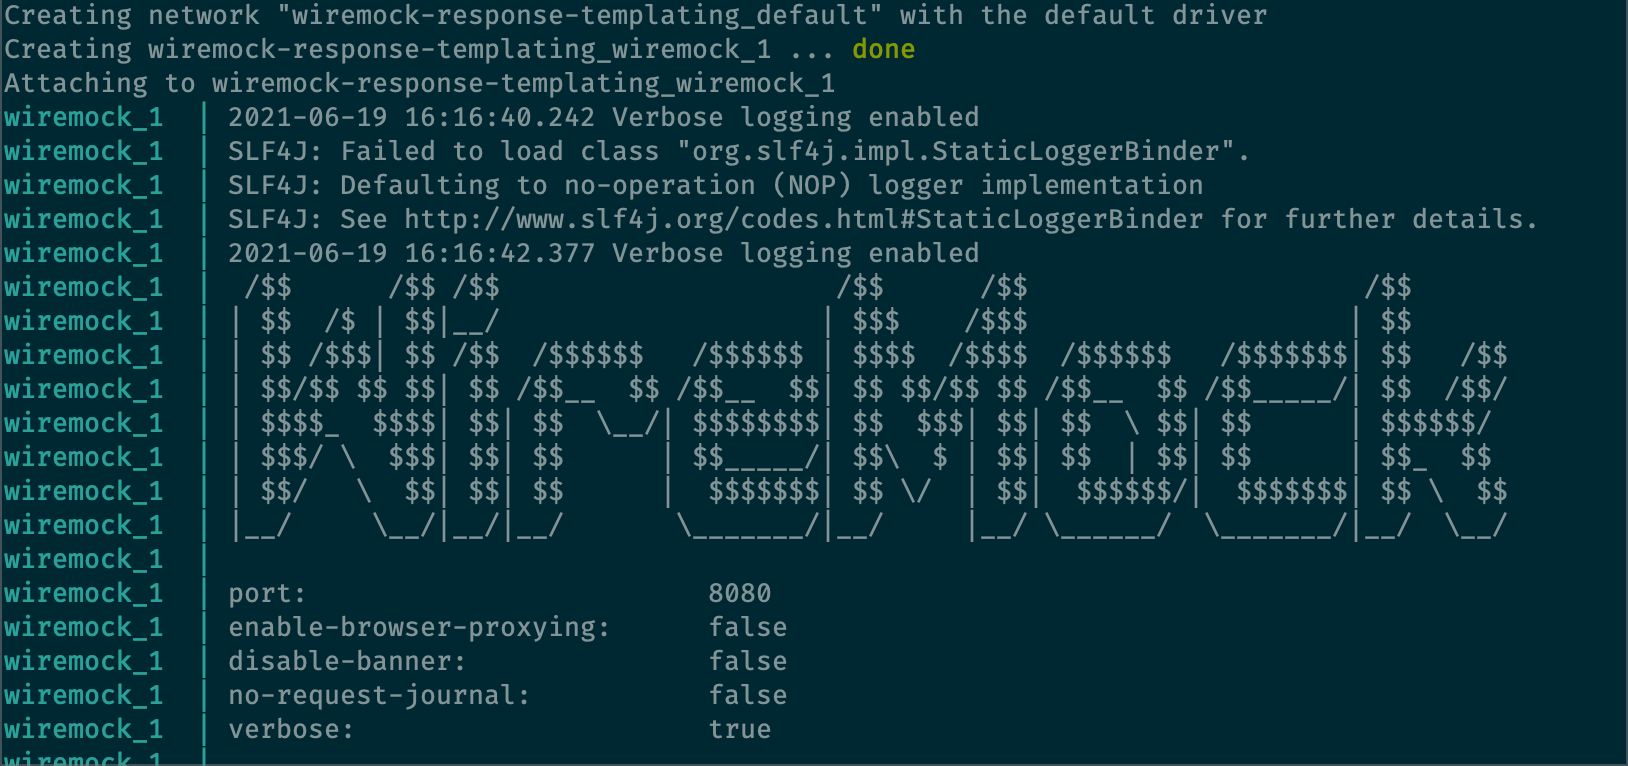
Before we start adding any mocked endpoints, let’s test that we can start Wiremock. Run docker-compose up to set it up:
docker-compose -f docker-compose.yml upUpon successful startup, you should expect the output to look like the screenshot below:
Additionally, you can test it by sending an API request to http://localhost:8080/__admin/. The response should be a JSON payload similar to the one below
$ curl http://localhost:8080/__admin/
{
  "mappings" : [ ],
  "meta" : {
    "total" : 0
  }
}
Configure Songs API Mocks
We’re now ready to configure our API to be mocked.
Create a file under the wiremock/mappings directory, name it likedSongs.json.
Place the content below into the file:
{
    "request": {
        "method": "GET",
        "url": "/api/songs"
    },
    "response": {
        "status": 200,
        "headers": {
            "Content-Type": "application/json"
        },
        "jsonBody": [
            {
                "id": "8efe58ee-a5cf-4926-bcd2-92c7e2ec82ba",
                "songInfo": "Jam Now, Simmer Down - Blinky Bill",
                "likedOn": "2021-06-19",
                "listenCount": 34
            },
            {
                "id": "724d520f-15b0-4c2f-9999-a28b2531195c",
                "songInfo": "Dunia Ina Mambo - Just a Band",
                "likedOn": "2020-12-04",
                "listenCount": 182
            }
        ]
    }
}
The request section defines details about what the incoming request should be like.
The response section defines details about the mocked response being returned.
jsonBodykey allows us to define the response body for an API that returns a JSON response. If our API was returning a non-JSON response, we would usebodyinstead.
Read more about available fields in the Wiremock Stubbing Docs.
Save and close the file. Your project directory should now look something like this:

If your Docker container is still running, there are 2 ways to have wiremock detect the new changes:
- Restart the Docker container by running:
docker-compose -f deploy/docker-compose.yml restart wiremock - Sending a “reset” command to wiremock to have it refresh the files (via an HTTP request to the reset endpoint):
curl -X POST http://127.0.0.1:8080/__admin/mappings/reset. I find this approach faster.
Making another request to the admin endpoint (http://localhost:8080/__admin/) should now show our new mapping:
$ curl http://localhost:8080/__admin/
{
  "mappings" : [ {
    "id" : "5e861de2-c679-4771-8f07-a83e3dd38dc2",
    "request" : {
      "url" : "/api/songs",
      "method" : "GET"
    },
    "response" : {
      "status" : 200,
      "jsonBody" : [ {
        "id" : "8efe58ee-a5cf-4926-bcd2-92c7e2ec82ba",
        "songInfo" : "Jam Now, Simmer Down - Blinky Bill",
        "likedOn" : "2021-06-19",
        "listenCount" : 34
      }, {
        "id" : "724d520f-15b0-4c2f-9999-a28b2531195c",
        "songInfo" : "Dunia Ina Mambo - Just a Band",
        "likedOn" : "2020-12-04",
        "listenCount" : 182
      } ],
      "headers" : {
        "Content-Type" : "application/json"
      }
    },
    "uuid" : "5e861de2-c679-4771-8f07-a83e3dd38dc2"
  } ],
  "meta" : {
    "total" : 1
  }
}
Call the Mocked Endpoint
Finally, we can now make an API call to the mocked endpoint, and get our mocked response!
$ curl -X GET http://localhost:8080/api/songs

[{"id":"8efe58ee-a5cf-4926-bcd2-92c7e2ec82ba","songInfo":"Jam Now, Simmer Down - Blinky Bill","likedOn":"2021-06-19","listenCount":34},{"id":"724d520f-15b0-4c2f-9999-a28b2531195c","songInfo":"Dunia Ina Mambo - Just a Band","likedOn":"2020-12-04","listenCount":182}]
With this in place, you can start building your application without having to call the real endpoint!
Summary
In this part of the series, we went through an introduction to Wiremock, and showed how to use Docker to set it up.
We also mocked an API endpoint.
With this, we now have a mocked API that allows us to make requests to a dummy endpoint.
References
Shout out to rodolpheche for building and maintaining the Wiremock docker image.
Additionally, thanks to jtonic’s response in this StackOverflow question for the tip about using the reset endpoint to refresh the mappings.
Finally, all the code used in this blog post is available in this repository: wiremock-docker-demo
Part 2: Dynamic Responses
Read Part 2 of this series to learn how to return dynamic responses from your mock!
Until next time, happy coding! Take Care!